Showing posts with label lemon. Show all posts

Tuesday, May 20

Mini Custards with Limoncello-Spiked Raspberry Sauce

lemon custard

There are many things I miss about not living close to my family, such as seeing my young nieces dress up for their first father-daughter dance, visiting my grandmother at the nursing home, and celebrating family birthdays (like my dad's 70th last year). Thanks to Dad, I have something new to miss: homemade limoncello.

A couple of months ago, he and his long-time Italian friend, Tony, made homemade limoncello (lee-mon-chay-low), an Italian liquer made from lemons and flavorless grain alcohol like vodka. It's vibrantly lemony and mouth-puckeringly tangy.

Limoncello isn't just for drinking though. It enlivens sweet fruit sauces and is lovely whipped into mascarpone cheese and served with fruit.


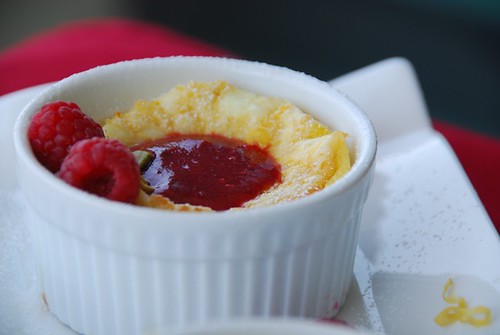
These simple lemon custards I'm sharing today are beautiful in their simplicity. Creamy lemon-infused custard is topped with a chilled limoncello-spiked raspberry sauce that makes each bite pop. It's refreshing and sweet, and did I mention low-fat? What's not to love? That's why I'm sending it to Helen of Tartelette, host of Sugar High Friday #43: Citrus.

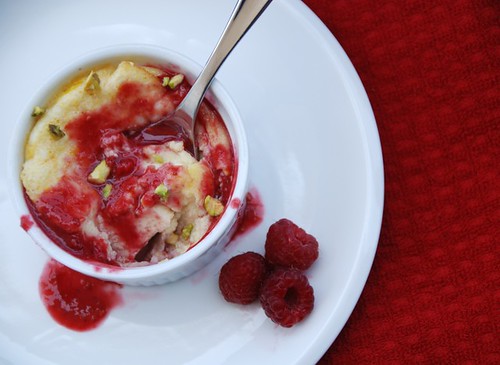
diving into lemon raspberry custard

Mini Custards with Limoncello-Spiked Raspberry Sauce
Serves 6
Print recipe only here.

Custard:
4 large eggs
3/4 cups sugar
2 tablespoons all-purpose flour
pinch salt
1 teaspoon pure vanilla extract
1 teaspoon lemon extract
1/4 teaspoon lemon zest (preferably Meyer lemon)
1 3/4 cups skim milk

Sauce:
1 cup frozen raspberries (unthawed)**
3 tablespoons water
1 tablespoon limoncello
2 1/2 tablespoons sugar, or to taste

Garnishes:
fresh raspberries
lemon zest, optional
1-2 tablespoons chopped pistachios

**I actually prefer using frozen raspberries to fresh for the sauce because it comes much thicker and clings deliciously to the custard. If you would rather use fresh berries, then just use less liquid.

Position a rack in the center of the oven and preheat to 350 degrees F. Coat 6 (3-inch-wide) ramekins with cooking spray and place on a baking sheet.

To make the sauce, puree all sauce ingredients in a food processor until smooth. Sauce can be made ahead and refrigerated in an air-tight container for up to several days. Serve chilled or at room temperature.

In a large bowl, whisk all custard ingredients until smooth. Divide evenly among ramekins.

Bake at 350 degrees F for 25 minutes, or until golden brown and puffy. Cool on a rack.

Custards can be served either at room temperature or slightly chilled. Add a couple of spoonfuls of raspberry sauce to each ramekin, then garnish with fresh raspberries, lemon zest and chopped pistachios.

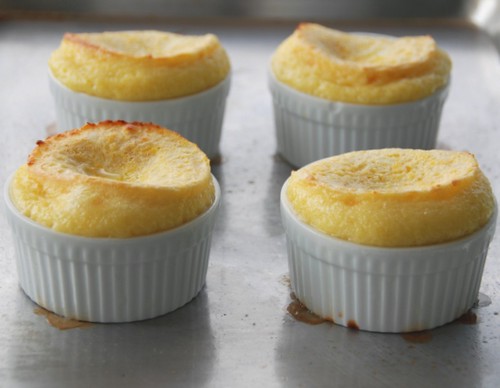
lemon custards straight from the oven
When you take the custards out of the oven, they are impressively puffy. Within 1-2 minutes, they will deflate, so you'd better be quick if you want to take a picture.

You might also like these citrus-spiked baked goods:

Coconut Lemonquat Tea Cake


Date, Fennel, and Pistachio Scones (Heart Healthy & Low Fat!)


Olive Oil Cake with Rosemary and Lemon


Save This Page on Del.icio.us

Sunday, January 27

What's More Fun Than Saying Lemonquat? Eating Coconut Lemonquat Tea Cake

Is there another name as fun to say as "kumquat"?

Yes. Lemonquat, limequat, and orangequat (also called mandarinquat).

I didn't make these up; they are citrus hybrids -- part kumquat and part lemon, lime, or orange, respectively.

fresh lemonquats and orangequats

Last year I shared a sensory experience of my first tart, lip-puckering kumquat. Ever since that day nearly two years, I anticipate kumquat season (which runs from January-May).

Imagine my excitement when a couple of weeks ago, I discovered mandarinquats on Eggbeater's delightful blog. I was determined to find them. Last Sunday, I did.

A soft-spoken, affable farmer named George T. Schnurer, who owns and operates Betty B's Ranch in Ramona, California, sells a wide variety of cheerful citrus, including orangequats, lemonquats, and di rigeur Meyer lemons.

Though the juicy sweet-tart orangequats have a robust orange flavor that I love, I am positively smitten with the lemonquats. You might expect given their name that lemonquats are overly sour or acidic. They aren't. Like lemon drops, they're rather sweet with hints of tartness.

Lemonquats like kumquats are entirely edible. Though wonderful raw, they're simply amazing in baked goods. Despite their playful name and unique flavor, there aren't too many recipes for lemonquats, that is, except for hard drinks. Since this is G- rated blog, I figured I'd do something more wholesome, like cake.

So I consulted the ultimate baking cookbook: Dorie Greenspan's Baking: From My Home to Yours. I used Dorie's basic Coconut Tea Cake, then flavored it with lemonquats (rind and pulp included), and drizzled it with a simple lemon icing, toasted coconut, and sliced lemonquats.

It was truly one of the most scrumptious cakes I've ever eaten. Biting into the slightly crunchy, sweet icing gave way to a fabulously moist, dense cake speckled with tiny bits of explosively flavored lemonquats. It's ideal for brunch or an afternoon snack since it's not overly sweet. Rest assured, however, the flavor will leave you sighing with contentment.

If you can't find lemonquats (they're grown primarily in California and have a heartbreakingly short season), then try Melissas.com which sells all types of produce online. Otherwise, I would suggest substituting Meyer lemons or regular lemons with a bit more sugar since they're not as sweet.


Coconut Lemonquat Tea Cake
Print recipe only here.

Cake:
2 cups all-purpose flour
1 teaspoon baking powder
pinch of salt
1 cup canned unsweetened lite coconut milk, stirred well (or regular coc. milk)
1/2 stick (4 tablespoons) unsalted butter, cut into 4 pieces
4 large eggs, preferably at room temperature
2 cups sugar
3 de-seeded lemonquats, with the rind, minced until pulpy, (about 1/4 cup), plus 1 tablespoon of lemonquat juice**
1 teaspoon pure vanilla extract
1 cup shredded sweetened coconut, toasted

Icing and garnish:
1 cup confectioners' sugar
2 teaspoons fresh lemon juice
a few droplets of milk

1/4 cup shredded, sweetened coconut, toasted
2-3 lemonquats, thinly sliced and de-seeded

Place rack in center of oven and preheat to 350 degrees F. Butter or coat with cooking spray a 9-10-inch Kugelhopf or Bundt pan. Dorie advises to not place the pan on a baking sheet, since you want the oven's heat to circulate through the inner tube.

To toast the coconut, place in a dry skillet over medium heat, and gently stir until aromatic and golden brown, about 2 minutes. Remove from heat and set aside. Keep your eye on it since it burns quite quickly!

In a large bowl, sift the flour, baking powder and salt together.

Pour the coconut milk into a small saucepan, add the butter, and heat until the milk is hot and the butter is melted. Remove from the heat but keep warm.

Working with a hand mixer, or stand mixer fitted with the whisk attachment, in a large bowl beat the eggs, sugar, and minced lemonquats with juice at medium-high speed until pale, thick and almost doubled in volume, about 3 minutes. Beat in the vanilla. Reduce the mixer to low and add the dry ingredients, scraping down the sides of the bowl as needed and stopping just when the flour dissolves.

Keeping the mixer on low, add 1 cup of coconut, mixing only until blended, then slowly add the hot milk and butter. When the mixture is smooth, stop mixing, and stir it a couple of times with a rubber spatula to be sure it's throughly mixed. Pour the batter into the pan and gently shake it to even the batter.

Bake for 50 to 55 minutes, or until the cake is golden brown and a cake tester inserted deep into the center comes out clean. Transfer the cake to a rack and cool for 10 minutes before unmolding onto the rack to cool at room temperature.

Meanwhile, make the icing in a small bowl by whisking together 1 cup confectioners' sugar and 2 teaspoons fresh lemon juice. Add a few droplets of milk and continue whisking until the icing is smooth and thin yet clings to the back of a spoon. When it's ready, pour it through a fine-mesh sieve to remove any tiny clumps of confectioners' sugar (thanks, Mom!).

Unmold the cake, and place on a rack. Using a spoon, drizzle the icing in a back-and-forth pattern on the slightly warm cake. Sprinkle with 1/4 cup of toasted coconut, and garnish with sliced lemonquats. Allow to set for at least 15 minutes before slicing.

**If you are unable to find lemonquats, then I suggest using sweet and tangy Meyer lemons or regular lemons sweetened with a little bit of sugar. I would mince 1/4 cup's worth of lemon pulp, the zest of 1 lemon, 1 tablespoon juice, and 1 tablespoon sugar. Of course, you can make it sweeter if you like.

Coming soon to a Food Blogga near you:
Orangequat Muffins!


You might also like:
Date, Fennel, and Pistachio Scones
Olive Oil Cake with Rosemary and Lemon
Tuscan Torta di Mele (apple cake)

Other delicious lemon-y desserts I've seen:
Lemony Meyer Lemon Curd from Figs with Bri
Lemon Meringue Bars from Baking Bites
Citrus-Glazed Polenta Cake from Dulcedo


Save This Page on Del.icio.us

Thursday, August 16

Watermelon and Mesclun Salad, More Dangerous than You Think


FoodBlogga Etiquette Tip #43: At dinner, never discuss politics, religion, or the issue of fruit on salad.

I was at dinner with friends recently where they served a delightful mesclun salad with fresh strawberries and parmesan cheese. Well, I thought it was delightful; my dinner companions disagreed.

As we were discussing benign topics such as the recent "humidity" we have been experiencing here in San Diego (laughable compared to the rest of the country this summer), I pointed out to one of my friends that she hadn't eaten any of her strawberries. "Don't you like strawberries?" I asked her. "Oh yes, I love strawberries," she replied, "but not on salad."

What was it she didn't like? Were the berries too sweet? Was it the mixing of vinegar and fruit? Her response: “I just don’t like fruit on salad.”

This sparked a surprisingly intense discussion. I can understand how some people hate cilantro because it tastes like soap to them, but strawberries or apple slices? One friend called diced melon on salad “just wrong,” while another declared, “strawberries belong on cereal not on salad.”

I was truly surprised by their passionate responses. Do you like fruit on your salad? And if you don’t, then help me understand why.

Here are two fruity salads that I just adore. (Anti-fruit&salad people might want to avert their eyes). My Watermelon and Green Olive Salad is adapted from a June 2006 recipe in Food and Wine. It's sweet and salty and savory all at once, plus it’s a pleasing blend of smooth and crunchy textures. I added the cooked shallots for their rich, caramelized flavor and seasoned it with lots of fresh parsley.

Watermelon and Green Olive Salad
Makes 4 servings
Print recipe only here.

1 tsp olive oil
1 shallot, thinly sliced
½ tsp sugar

6-8 cups mesclun, preferably with some arugula and radicchio mixed in
½-1 cup watermelon chunks
5-6 cured green olives, such as Cerignola or green Greek

1 Tbsp extra-virgin olive oil
2 Tbsp white wine vinegar
1 Tbsp watermelon juice
Salt and pepper, to taste
2 tsp fresh parsley, chopped

Heat 1 tsp olive oil in a small skillet over medium-low heat; add shallots and cooked until slightly caramelized about 5-7 minutes.

Whisk 1 Tbsp olive oil, vinegar, and watermelon juice until blended. Season with salt and pepper.

Add mesclun to plates, top with watermelon chunks, olive slices, and fresh parsley. Drizzle with dressing and enjoy!

I posted this Arugula, Strawberry, and Sugar Snap Pea Salad on Fit Fare back in June and had to post it here because it’s just too scrumptious not to share. I love the interplay between the sweet strawberries and peppery arugula which are complemented with a zippy, lemon-balsamic dressing. The fresh basil and mint really make this salad shine, so make sure you don’t skimp!

Arugula, Strawberry, and Sugar Snap Pea Salad
Makes 4 servings
Print recipe only here.

Salad:
6-8 cups arugula
1 cup sliced strawberries
1-1 ½ cup sugar snap peas

Dressing:
1 Tbsp extra-virgin olive oil
1 Tbsp white balsamic vinegar
1 Tbsp fresh lemon juice
Pinch of grated lemon zest
½ Tbsp water
Salt and pepper, to taste
A handful of thinly sliced fresh basil
A handful of fresh torn mint leaves

For dressing, whisk all of the ingredients in a small bowl.

The sugar snap peas can be eaten raw or cooked. To cook, simply drop in boiling water for 2 minutes; drain and plunge into a bowl of ice water. This will stop the cooking process and preserve the peas’ bright green color.

To prepare the salad, divide the arugula, strawberries, and sugar snap peas evenly among four plates. Add dressing; top with fresh basil and mint.


Since these salads are loaded with health-promoting antioxidants (especially lycopene in watermelon and strawberries), I'm submitting this post to Cate of Sweetnicks for her ARF 5-a-day Tuesday.

Here are a few more fruity salads I came across recently. If these bloggers like fruit in their salad, then I know I’m in good company.

Terry’s Arugula Salad with Peaches and Goat Cheese

Jeanne’s Roasted Nectarines in Prosciutto

Alanna’s Melon, Blueberry, and Feta Salad and Watermelon, Cucumber, and Feta Salad

Laura’s Spiced Orange and Avocado Salad


You might also like:

Mexican Citrus Salad with an Orange-Lime Vinaigrette

Sicilian Salad of Fennel, Oranges, and Olives

Bulgur Salad with Chickpeas, Cranberries, and Toasted Almonds

Summer is Time for Salsa and a New Handbag


Save This Page on Del.icio.us

Friday, July 13

Wild Arugula is Hot, Iceberg is Not


I've never really been one for following the latest trend. Although I just HAD to have a pair of GUESS jeans in the eighth grade (which, thankfully, my mom bought for me, allowing me to survive junior high with minimal permanent damage to my self esteem).

Like clothing, food can be fashionable. For example, last year was apparently the year of the pomegranate. From POM juice to pomegranate molasses, suddenly everybody had to have pomegranate. I still remember my mom's mystification at this craze: "We've been eating pomegranates for as long as I can remember. And now they want to charge an arm and a leg for them because they have antioxidants."

I think a similar infatuation with unusual salad greens has taken hold. Gone are the days of iceberg; now it's chic to eat hip greens like Mache or wild arugula. I grew up eating arugula because we grew it in our garden; therefore, I never considered it special. It was just that spicy lettuce we added to our salads in summertime. Yet, over the last few years arugula, along with the wild and baby arugula varieties, have become hot. It’s been featured in numerous cooking magazines, and many chefs laud its uses in everything from salads to pasta dishes and pizzas.

So, what's so "wild" about wild arugula? It's a slightly darker shade of green than regular arugula, has delicate fluted leaves, and packs a more intense flavor. Most chefs suggest eating wild arugula raw or just wilted to truly appreciate its flavor.

Eating freshly picked wild arugula is quite a sensory experience. First, you detect a spicy fragrance. Then, when you place a leaf in your mouth, you taste the slightest bitterness and heat. It's when you bite it though that things really get fun: it releases an explosion of flavor that can be best described as pungent or peppery. It’s no wonder that most Europeans call it rocket (from the German Rauke).

We don't call it rocket in The States apparently because the Italians who immigrated to America called it rucola, which became Americanized as arugula. Indeed, arugula is typically associated with Italian cuisine, as it has been cultivated in that area since Roman antiquity.

The best part about cooking with wild arugula, however, is the praise you will receive from your guests. Whenever I have company, I almost always make Jamie Oliver’s wild rocket pasta. Like everything Jamie cooks, it's delightfully easy to make and delicious to savor. In fact, both my mom and brother-in-law Jason have requested that I post about Jamie’s wild rocket pasta, so here it is.

Wild arugula is most commonly found at farmers' markets and speciality organic markets. If it's not available to you and you've got a green thumb, you can grow some pretty easily. It likes cooler temps and apparently thrives in the Midwest region of the country. If all else fails, then use regular arugula; I promise that it will still be flavorful. Just be sure to use all of the freshest ingredients you can find for this pasta, and it will shine. Oh, and by the way, arugula is also high in antioxidants, so I guess you can expect to start paying a lot more for it; sorry Mom.

This is my submission for this week's Weekend Herb Blogging, the fantastically successful food blogging event created by the talented Kalyn of Kalyn's Kitchen, and hosted by me.


Wild Rocket (Wild Arugula) Pasta

The measurements may not be exactly the same as Jamie's, but I know he wouldn't mind, since he's all about a "handful of this" and a "dollop of that." So, adjust the amounts below to satisfy your taste. Also, simply omit the anchovies for a vegetarian version. I can attest that it's fabulous without them too.

Print recipe only here.

2 garlic cloves, finely chopped
1 Tbsp olive oil
2 small cans of anchovies packed in olive oil
1-2 whole chilies, finely chopped (or as much heat as you can take!)
3 handfuls of wild arugula (or regular)
The zest and juice of 2 small lemons (or less if that is too tart for you)

8 ounces fettucine or thick spaghetti
About ¼ cup grated Parmesan cheese
Additional wild arugula to add on top
2-3 Tbsp extra-virgin olive oil for drizzling

While the pasta is cooking, prepare the wild arugula. Sauté the garlic in olive oil over medium heat. Just as it begins to turn golden, add the chili and anchovies. Lower the heat, and gently give it a couple of stirs. After a couple of minutes, the anchovies will start to melt; add the wild arugula, lemon juice and lemon zest at this point. Stir a couple of times, then turn off heat, so the arugula wilts but does not cook.

Once the pasta is cooked, add it to the pan with the arugula and toss. Add the Parmesan cheese, and toss to coat.

Divide the pasta among 4 plates; top each with a little more wild arugula, some good Parmesan cheese, and a drizzle of extra virgin olive oil.

Await praise from your guests!


Do you like the darling tomato pictured above? Her name is Blush, and I'd like to thank my friend Alanna for creating her to promote farmers' markets.


Save This Page on Del.icio.us

Wednesday, January 24

Brussels Sprouts on Botox

It happens every Sunday. Clamoring crowds jostle for space around the popular tables at the farmers’ market to check out the hip Meyer lemons, the chic wild arugula, and the sexy red strawberries (yes Dad, we really did have fresh strawberries this past week).

Not so at the cruciferous vegetables table. There lie the Brussels sprouts, kale, cabbages, broccoli, and cauliflower (of which only the funky Romanesco variety is getting any attention). These uncomely vegetables patiently wait for someone to come by and check them out. It is a long wait.

This past Sunday the Brussels sprouts were carelessly dumped in a lop-sided pile, causing stray runaway sprouts to keep rolling off the table's edge and onto the concrete. Inspired by Molly’s witty post at Orangette, I thought I would take on a challenge. A makeover for three undatable vegetables: Brussels sprouts, cauliflower, and broccoli. The make-up? Breadcrumbs.

There aren’t many foods in Italian homes that don’t get egged and breadcrumbed to spectacular results. Vegetables from eggplant to zucchini, meats from chicken to veal, and seafood from calamari to smelts, when made with the right breadcrumbs, are brilliant in their simplicity and fabulous in their flavor. Fortunately, my mom and dad had recently sent me a fresh container of Buono’s Bakery breadcrumbs from Rhode Island.

Seriously. My parents actually ship me breadcrumbs.

Turns out that the closest place to get good breadcrumbs from my apartment in LA is exactly 2,970 miles away (I Google mapped it). We cannot get good breadcrumbs here. "You’re crazy!" you say. Nope. We’re not. We have lived in California for 3 ½ years; we have tried pounds of breadcrumbs. They just don't compare. Every time we got breadcrumbs, we would always say, "Well, they’re not as good as Buono’s." So we decided, why not have mom ship us some? And so it began. As you will learn from this blog, there are many things which are shipped from RI to CA, most of which originate from Federal Hill in Providence.

If you can’t get Buono’s breadcrumbs, you can:

1. Make them from scratch.
2. Use Panko breadcrumbs.
3. Ask my mom to send you some. Actually, don’t. She seriously would send them to you.

Today, I’ll share the Brussels sprouts recipe; the cauliflower and broccoli ones will follow shortly. To keep my meals low-cal and healthy, I don’t fry vegetables; I prefer to bake them in a hot oven or to sauté them with a little bit of olive oil or butter. While I often make Brussels sprouts with a maple syrup or brown sugar glaze, I love this lighter, cleaner version as well. Here, the sprouts are par-boiled then sautéed until blistered, browned, and slightly crunchy. The savory butter and garlic mellows the sprouts’ bitterness, and the citrus adds a tangy, bright touch. It’s a breeze to make, and with the right lighting and make-up, even Brussels sprouts can look pretty.


Brussels Sprouts with Toasted Breadcrumbs and Lemon
Makes 4 servings.
Print recipe only here.

3 cups Brussels sprouts,halved
1 small garlic clove, minced
2 Tbsp butter
1 Tbsp lemon juice
Pinch of lemon zest
¼ cup breadcrumbs, toasted
Salt & pepper, to taste

Peel off any marked outer leaves of the sprouts and trim the bottoms; slice in half. Boil for 3-4 minutes. Drain and plunge into a bowl of ice water; this will stop the cooking and maintain the sprouts' vibrant color.
To toast the breadcrumbs, place in a dry skillet over medium-low heat. Cook for 2-3 minutes, while giving the pan handle a few shakes to toast the breadcrumbs evenly. Once they begin to turn golden, remove them from the heat and place in a bowl, as the heat from the pan will continue to toast them.

Meanwhile in a skillet over medium heat, sauté the garlic in the butter. Once the butter begins to bubble up and the garlic starts to jump a little, add the sprouts. Cook about 5 minutes, turning occasionally, until brown spots start to appear on the sprouts. Add the lemon juice, lemon zest, salt, and pepper. Add the toasted breadcrumbs into the skillet and toss gently. Add more breadcrumbs on top before serving; sprinkle with lemon zest if desired.