Showing posts with label grilling. Show all posts

Friday, May 25

Fire Up Your Imagination by Grilling Unusual Foods


Chances are good that you'll be firing up your grill this Memorial Day weekend, you and 71% of Americans. Chances are also good you'll be grilling hot dogs, hamburgers, steak and corn. But how about grilling some unusual suspects, like watermelon, sweet potatoes, even cake?

You can. Find out how in my latest article for the San Diego Union-Tribune, "Fire Up Your Imagination," which includes recipes for:

Italian-Inspired Grilled Pound Cake

Grilled Chipotle-Lime Sweet Potatoes

Smoky Grilled Guacamole

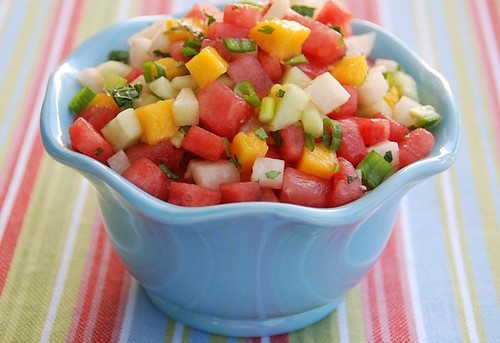
Spicy Grilled Watermelon, Cucumber and Jicama Salad, pictured below


What foods do you love to grill? Please share with us here or online at the U-T! 

Photo credit, FCC, mccun934.


Friday, January 2

Resolution 2009: Eat More Burgers. Starting With a Give-Away of La Cense Beef!

a Southwest hamburger

Eat less. Spend less money. Watch less TV. Ever notice how most New Year's resolutions are all about deprivation? Well, I'm not doing it.

For me 2009 is gonna be the year of more -- eating more hamburgers. Not McDonald's or Wendy's, but homemade. I may not have a drive through, but I've got the best hamburgers I've ever eaten. It started out with a sample of grass-fed beef from La Cense, a ranch in Montana. I was not expecting much; I'm not really not a hamburger kind of girl. They claim that their unique stress-free ranching, marbled beef, and aging process makes for a beef flavor that's truer, cleaner, and more complex. I have to say, I actually agree with them. It is delicious.

la cense frozen beef
(La Cense beef is packaged with dry ice.)

I made these burgers during an NFL football marathon last weekend. The burgers were better than the football (and there was some really good football last weekend). I grilled them adulterated. The meat was tender, juicy, and richly flavorful. Plus since they're 100% lean beef, they maintained their shape perfectly.

I thought I would just add some caramelized onions and then halfway through cooking them, I decided to turn them into Southwest Burgers. I slathered the smoky grilled meat with a spicy, creamy chipotle mayo and topped them with a mound a sweet, sticky caramelized onions and melted Cheddar cheese. Of course, all of this meaty goodness was sandwiched inside of a toasted sesame seed hamburger bun. (Ta-da-ta-ta-taaaah! I'm lovin' it!)

Now, you know you want a burger too. And starting today, you have a chance to win your own free package of La Cense beef. Here's what you have to do to win:

Just tell me what your favorite type of hamburger is by the end of the day, January 16, 2009. That's it.

One winner, who will need to provide her or his real name and mailing address, will be randomly selected and announced in a future post, so please check back. Don't have a blog? Just leave an active email address where you can be reached. My apologies to my international readers, but given the perishable nature of the prize, winners are limited to US residents.

Finally, if you like a good party, then consider becoming a member of the Grass-Fed Party, "an organization of people who support grass-fed foods and sustainable ranching and believe that American can hold higher standards to its cattle industry." Now that's my kind of New Year's resolution.

a Southwest hamburger

The Southwest Hamburger

Makes 2 (8 oz) or 4 (4 oz) burgers
Print recipe only here.


1 pound La Cense hamburger
hamburger buns
a dab of butter or canola oil

1 teaspoon canola oil
1 large yellow onion, thinly sliced
1 teaspoon sugar

1 tablespoon soy mayonnaise (or mayo of your choice)
1 tablespoon chiles in adobo sauce, chopped
a squeeze of lime juice

4 ounces sliced Cheddar or Monterey Jack cheese


Preheat the grill to medium high. Using your hands, form the hamburger into patties and set aside.

On the stove top, pour 1 teaspoon canola oil in a large skillet over medium-low heat. Add the sliced onions; sprinkle 1 teaspoon sugar evenly over the onions and toss to coat. Cook the onions for 10-12 minutes, stirring occasionally until caramelized. Remove from heat and set aside.

In a small bowl, mix mayo, chiles in adobo sauce, and lime juice; set aside.

Once the grill is hot, place the hamburgers on a clean, well-oiled grate and close the grill cover. Grill for 5-6 minutes per side, or as long as you prefer. (Don't squeeze them flat with a spatula or you'll release their delicious juices.) Use a meat thermometer for the precise level of doneness -- a medium burger is 130 degrees. Cook the meat less is you prefer it rare or longer if you prefer it well done.

Brush the hamburger buns with a dab of butter or oil. Grill for 1 minute or until desired level of toastiness is reached.

Spread some chipotle mayo on the toasted buns. Place hamburgers on the buns and top with cheese, so it will melt. Mound some caramelized onions on top, and eat immediately!

You might also like these football friendly foods:

Broccoli Rabe (Rapini) and Sausage Sandwich with Sharp Provolone


Potato, Rosemary, and Gorgonzola Pizza


Chicken, Jalapeno and Cheddar Quesadillas


Healthy Chili


Save This Page on Del.icio.us

Wednesday, September 3

How to Make Elote, or Mexican Grilled Corn

Mexican grilled corn


Three years ago I discovered something at the farmers' market that changed my life: it's called elote (Mexican grilled corn).

Despite the fact that it was only 10:30 in the morning, the aroma of smoky grilled corn lured Jeff and me to a stand where open grills were covered with plump ears of roasting corn. As soon as each ear was cooked it was quickly jammed onto a stick then drowned in a lime-spiked mayonnaise sauce, rolled in crumbly cotija anejo cheese and sprinkled with lime juice and cayenne pepper. Each customer's eyes widened in anticipation when handed this unusual treat.

Since that day, I have learned that the Spanish word "elote" can refer to corn or to grilled corn and that it's a common street food in many parts of Mexico. Like the famed fish taco, grilled corn is classic street food: unpretentious yet remarkable in its unique flavor. It's hot and creamy and salty and spicy, and utterly, wholeheartedly addictive.

You don't have to live in Southern California to experience Mexican grilled corn; it's easy to make at home (which you simply must do before the end of corn season). Just be sure to have lots of napkins on hand. You'll need them. Or if it’s just too messy for you, then cut off the grilled kernels, mix them with the ingredients, and eat it with a spoon. It may be neater, but it’s not nearly as much fun.

Elote, or Mexican Grilled Corn
Serves 4
Print recipe only here.

4 ears sweet corn
1/4 cup mayonnaise
1/2 teaspoon lime juice
1/8 teaspoon cayenne pepper of chile powder
salt, to taste
2/3 cup crumbled cotija anejo cheese
lime wedges
extra cayenne pepper of chile powder, for sprinkling
fresh finely chopped cilantro for optional garnish


Soak corn (in husks) in cold water for 25-30 minutes.

Prepare a medium-hot grill. Peel back the corn husks leaving them attached at the end. Remove the silk. Pull the husks back up and tie with a spare piece of husk or a small piece of cooking twine. Place the ears on the grill. Cook 20-25 minutes, turning several times to ensure even roasting. The kernels should be soft when fully cooked.

If you’d like the kernels more charred, then simply follow the above instructions, but cook in husks for 15 minutes only. Then cool ears slightly, pull back the husks (to use as handles) and place the ears directly on the grill (with husks overhanging the side) for 5-7 minutes, or until they reach desired level of charring.

Place crumbled cheese on a plate large enough to fit an ear of corn. In a small bowl mix the mayonnaise, lime juice, cayenne pepper or chile powder, and salt. When the corn is cooked, brush each ear with some mayo sauce then roll in the cheese. Serve with lime wedges, additional cayenne pepper or chile powder, and fresh finely chopped cilantro.

** Cotija anejo, a mild-flavored Mexican cheese with a crumbly texture, can be found in Mexican markets or in the refrigerator section of most major supermarkets. Queso fresco, another mild Mexican cheese, is a good substitute and also can be found in most major supermarkets.

Note: If you are unable to grill outdoors, then you can oven roast the corn. Preheat oven to 350 degrees F and place corn in husks (no need to soak first) directly on the middle rack of the oven for 30 minutes, or until corn is soft to the touch. Allow to cool slightly, then remove husks and silks, and add toppings.


Save This Page on Del.icio.us

Sunday, August 31

How to Roast Peppers with Jerry Lewis

roast peppers stage 2

I hate Labor Day. I always have. This is, no doubt, because growing up, Labor Day always meant three things:

1. School starts in two days (ugh)
2. The Jerry Lewis telethon and
3. Roasting obscene amounts of red bell peppers with my dad

Every year, Dad would spend the entire Labor Day weekend roasting, pickling, and canning for the winter months. He didn't need to. We lived in Providence, Rhode Island where virtually every street corner boasts an Italian deli selling all of the foods he made. But like stocking food in his basement, Labor Day canning was a ritual that was ingrained in Dad.

My father grew up in an Italian family with two parents and six siblings. Since this was before Costco, it took some resourcefulness to feed all of those growing bodies on a meager income. So his parents would often buy vast amounts of foods on sale and pickle, roast, stew, can, and stuff anything that could take it.

August was the month of hard labor in Dad's house. I love to hear him tell stories of the "assembly line" he and his siblings made to be efficient -- they had to be. After all, they would cook dozens of bushels of summer tomatoes to be used for Sunday gravy throughout the winter. And they would tackle scores of crates full of late summer eggplant, peppers, and cucumbers that were pickled or roasted then jarred and enjoyed year-round.

roasted red peppers plate

Throughout my entire life, Dad would go to his cousin Nicky's farm to buy produce. Every single Labor Day weekend, he'd arrive home and announce with pride to my mother, "I just got some beaut--ee-ful red bell peppers from Nicky's."

"Oh, yeah? How many did you get?" she'd asked, fearing his reply.

"Not too many this year. About three bushels," he'd say.

"Three bushels? What are we gonna do with three bushels of peppers?" she'd ask reflexively, knowing his reply before he could answer.

"I'll roast them tomorrow while the telethon is on," he'd say.

And I would let out a big, dramatic, sigh. "Ugh. Another Labor Day spent roasting peppers with Jerry Lewis."

After I was married, I decided I would never spend Labor Day weekend watching the telethon or cooking, and for years I didn't. Until one fateful day a few summers ago when I found a farmers' market selling an entire case of red bell peppers for $11. I felt like I had hit the jackpot! As I proudly stumbled along with my big box of peppers, Jeff stood looking on, aghast.

"What are we going to do with a whole case of peppers?" he asked.

"Roast them," I said.

And that's when it hit me. I am my father's daughter. I realized then that Dad didn't roast peppers on Labor Day just to torture me; rather, I think he believed that unlike the fleeting pleasure of going to the movies for a couple of hours, roasted peppers would bring you happiness for months to come.

I did end up roasting peppers that Labor Day Weekend, though I did not turn on the telethon. Then like Dad, I froze bags full of roasted peppers that Jeff and I enjoyed year-round.

Since our local market had red bell peppers on sale for 47 cents each last week, I bought a dozen. On Thursday I went down to the grills and starting roasting. I didn't miss Jerry Lewis, and I didn't miss the back-to-school dread I always experienced, but I did miss Dad.

I know you can buy jarred roasted peppers, but where's the challenge in that?

Here's how to make roasted peppers in four easy steps:

  1. Preheat a grill to high. Place peppers on the grill, rotating several times, until fully blackened (about 20 minutes).
  2. Place grilled peppers inside a paper bag and close the top tightly. Place the bag inside a large bowl (to catch any juices that spill out), for about 10 minutes. The steam will help the skins peel off more easily.
  3. Remove one pepper at a time. Place on a cutting board, and split open. Remove the stem and the seeds.
  4. Using a piece of paper towel, rub the skins off. If you have trouble removing them, then steam them a bit longer; otherwise, they should come off easily.
Note: If you don't have a grill, then you can roast or broil the peppers in the oven. You can even place them directly on the burner of a gas stove.

To freeze roasted peppers, place cooled peppers in a single layer in a Ziploc freezer bag. Defrost by placing in the refrigerator until thawed or by defrosting in the microwave.

Print recipe only here.

roast peppers stage 3
After about 10 minutes of grilling, the peppers will begin to form black blisters. After about 20 minutes, they will become fully blackened, like the middle left pepper above, and should be removed from the grill and placed in a paper bag to steam.

roasted pepper split
After the peppers have steamed in a paper bag for about 10 minutes, place them on a cutting board, split open, and remove the stem and the seeds. You can see how the skins are already beginning to peel off.

roasted pepper peeling
Using a piece of paper towel, rub the skins off.

Here are some easy, delicious ways to enjoy roasted peppers:
  • Add to an antipasto with items such as Italian cheeses and cured meats, olives, marinated mushrooms, and peppadews.
  • Finely chop and stir into tomato sauce for pasta or stir into soups.
  • Dice and add to a fritatta or omelette.
  • Dice and blend into hummus or a favorite dip.
  • Add to crostini, bruschetta, pizza, or sandwiches.
  • Make grilled vegetable stacks with eggplant, zucchini, peppers, and fresh mozzarella.
You might also like:

Roasted Pepper, Olive, and Brie Bruschetta


Clotilde's Red Quiona Salad with Bell Peppers and Pine Nuts
Kayln's Roasted Peppers
Susan's Roasted Red Pepper Tomato Soup
Lisa's Puy Lentil, Feta, and Roasted Red Pepper Salad

Monday, June 30

Grilled Steak Tacos with Watermelon-Mango-Jicama Salsa

watermelon half

How much watermelon does the average American consume each year? (answer below)

A. 6 pounds
B. 16 pounds
C. 38 pounds
D. 312 pounds

It's already the Fourth of July, and if you haven't had a watermelon yet, then this is the week to start. I mean, really, a Fourth of July without watermelon is like a birthday without a cake.

I love eating plain watermelon in its simple, sweet glory, but it’s also fantastic in savory dishes. The key is to pair it with contrasting flavors such as salty cheeses, bitter salad greens, acidic vinegars, or smoky grilled meats to balance the watermelon's sweetness.

grilled steak tacos with watermelon-mango-jicama salsa

In fact, why not try something different for this Fourth of July -- like my new Grilled Steak Tacos with Watermelon-Mango-Jicama Salsa? For this dish, char-grilled steak is topped with a sweet and tangy watermelon salsa and crumby Mexican cheese. This salsa is so refreshing that you may want to make extra so your guests can dunk their tortilla chips in it while they're waiting for the steak to grill.

Then, while they're munching, you can show off your watermelon knowledge: the average American eats 16 pounds of watermelon a year! Course, I have over 20 pounds a year myself, so there a few people out there eating less than 16 pounds to average things out.

watermelon-mango-jicama salsa

Grilled Steak Tacos with Watermelon-Mango-Jicama Salsa
Makes 4 servings
Print recipe only here.

Salsa:
2 cups diced watermelon
1 cup diced mango
¾ cup diced, de-seeded, peeled cucumber
¾ cup diced jicama
2-3 green onions, finely chopped
1 serrano chile, with half the seeds
1 small avocado, diced
1 tablespoon lime juice
1 teaspoon sugar
1 teaspoon olive oil
1 teaspoon rice vinegar
2 tablespoons each of fresh chopped mint and cilantro
Salt, to taste

Steak:
4 (4-6 oz.) top sirloin steaks
Salt and pepper
8 white corn tortillas
½ cup Cotija Anejo cheese

Heat the grill to high. Season both sides of the steak with salt and pepper. Place steaks on the grill, close cover, and cook until charred, about 5 minutes. Closing the cover will help create a charred exterior and a softer, juicer interior. Turn steaks over, lower the heat to medium-high, and cook another 3-4 minutes for a medium-rare steak or 5-6 minutes for a medium steak. Allow to rest for 5 minutes before slicing.

Heat tortillas on the top rack of grill for about for 1 minute per side or until warmed through.

Place the sliced steak on the tortilla shell, spoon some salsa on top, and sprinkle with cheese. Serve immediately.

Note: Cotija Anejo is a mild flavored Mexican cheese with a crumbly texture and can be found in the refrigerator section of most major supermarkets.


And don't forget about grilled watermelon
for dessert!


Grilled Watermelon Slices with a Honey-Lime Syrup


You might also like:

Watermelon and Green Olive Salad


Susan's Summertime Salsa


Swordfish with Pineapple-Mango Salsa


Shrimp Tacos with Citrus-Avocado Salsa


Save This Page on Del.icio.us

Monday, August 27

Try Grilled Watermelon for Your Labor Day Weekend Barbecue

I figure I’ve eaten about 20 pounds of watermelon this summer. Fortunately, it’s 92% water and 0% fat, so my clothes still fit fine.

Even as a kid, I ate a lot of watermelon. Everyone in my family did. I can remember my Dad, his face beet-red from the heat, coming through our back door beaming as he was carrying a colossal watermelon. He always did the same thing: set it down on the kitchen counter and proudly announced its weight -- 19 and 1/2 pounds! 23 pounds! Like his lobsta, the bigger it was, the better he liked it.

My brother Chris was always the one to cut the watermelon (seeing as none of the rest of us had his patience). With skills of a surgeon, he extracted every last seed while keeping the melon’s flesh intact. Come to think of it, I don't remember ever seeing seedless watermelons when I was a kid. Did they exist back then?

I do remember, however, that on a stiflingly humid New England day there was little else that could bring as much pure pleasure as a crisp cold piece of watermelon saturated with sweet juice that dripped down your arms and chin as you slurped your way along.

Indeed, my grandmother, Nan, who avoided the sun and heat at all costs, would stay cool in large part by eating chilled watermelon. And she always said the same thing to me when she wanted some: “Susan, I’m so dry. Would you get me another slice of that watermelon?” Then she’d say to me that I "look dry,” and insist I eat more watermelon. I always did and still do.

Even though it’s just the two of us now, I buy watermelon every week and announce the weight to Jeff when he comes home. 15 pounds! 18 pounds! (I told you I've eaten a lot of it). I only buy seedless now; Chris still lives in Rhode Island, and I still don’t have the patience to remove the seeds.

I've made many watermelon dishes this summer, and this grilled watermelon is one of my favorites. If you're planning a Labor Day Weekend Barbecue, then it's a simple and healthy dessert to make.

Wondering how to grill a watermelon? It couldn't be easier. Simply rub some honey on watermelon slices and place on a hot grill for about 2 minutes per side until marks form and they become caramelized. You could eat it just like that or top it with my tangy honey-lime syrup. It contrasts surprisingly well with the slightly smoky flavor of the grilled watermelon.

Grilled Watermelon Slices with a Honey-Lime Syrup
Print recipe only here.

Several slices watermelon
Some honey for brushing watermelon slices

Juice of 2 limes
the zest of half a lime
3 tablespoons honey
2 teaspoons water
A few dashes of cayenne pepper
A couple of pinches of salt

Preheat grill to high. Cut watermelon into 1-inch thick slices. Brush each side lightly with some honey and place on grill. Grill until just browned, about 2 minutes per side. Place watermelon slices on a plate and drizzle with the honey-lime syrup.


You might also like:
Warm Citrus and Banana Cups
Watermelon and Green Olive Salad
Grilled Lamb Kebabs
Grilled Lamb Sandwiches
Jumbo Grilled Lobsta

You might also like to check out:
Jyothsna's recipe for a refreshing Watermelon Ice Cream.
Christine's recipe for a lovely Melon and Capriole Goat Cheese Salad.

Save This Page on Del.icio.us

Wednesday, August 8

Guys, Grilled Lamb, and Giada (Well, More Bobby Flay Actually)


When Jeff watches t.v., it’s typically one of three types of shows: sports (he’s a guy), nature/science programs (he’s a doctor), and cooking competitions (I’m stumped). He’s not so much into instructional cooking shows, though he doesn’t mind Giada’s Everyday Italian (he’s a guy). What he really likes are the cooking competitions, like Top Chef and Iron Chef America.

One night last summer, we saw a particularly inspiring episode of Iron Chef featuring Bobby Flay, Jeff’s second favorite chef after Cat Cora (he’s a guy; Jeff, not Cat, that is). We like Bobby’s creativity and the way he makes ordinary grilled food seem chic.

So the following day when I went to the library, I checked out a couple of his books, including Grilling for Life and Boy Gets Grill. They were mixed in among a 4-foot high pile of cookbooks (including many baking ones) that caught Jeff’s eye when he came home.

Picking through the pile like he was looking for the perfect apple among many bruised ones, he paused upon seeing Bobby’s books. “Hon, why do you have two Bobby Flay grilling cookbooks?” he asked.

“Because he’s the guy you really like on Iron Chef, so I thought I’d check out some of his recipes,” I replied.

“So, are you planning on just reading them or actually making something from them?” he asked.

“Making something. Why else would I have gotten them?” I said. (Though we both instantly realized the flaw in that argument—for the next three weeks, the closest thing those baking books would come in contact with is dust.)

“But hon, we don’t have a grill,” he said delicately.

“I know we don’t have a grill, but we will some day,” I said.

For the last three years, we lived in a WWII era home with many charming traits, including honey-colored hard woods and a fragrant lemon tree outside of our bedroom window. However, since these homes were built about 8 inches apart from one another, grills were not allowed.

We’re in a new place now that was recently constructed, so we have not one but two grills. As a result, Bobby and I have become pretty tight.

So when I received an email a couple of weeks ago from Rachelle of the American Lamb Board, offering me some lamb, I didn’t hesitate to accept or to consult Bobby. When I asked Jeff if he would prefer Bobby’s lamb sandwich with a sage aioli and sun-dried tomato tapenade or lamb kebabs with a minted yogurt chutney and tomato-eggplant jam, his answer was “yes.” I made both.


My experience was wonderful. As Rachelle promised, the package of lamb from Superior Farms arrived on time; it contained an 8-9 pound piece of lamb, 4 skewers, a meat thermometer, some dried rosemary and Turkish oregano from Penzey’s, and some recipes from the Board.

Lamb is a versatile meat that can be cooked in various ways with various seasonings. To make the most succulent lamb possible, marinate it overnight in olive oil and fresh herbs; this helps tenderize the meat and infuse it with flavor. Also cook it on a thoroughly preheated grill until medium-rare to prevent it from becoming tough. The result: charred on the outside, buttery on the inside. In fact, when Jeff finished his sandwich, he said, “This is palpably better than store-bought lamb. You better find out how much this costs to ship, cause we gotta get this again.”

This recipe for Grilled Lamb Sandwiches with Sage Aioli and Sun-Dried Tomato Tapenade is from Hot Off the Grill with Bobby Flay on The Food Network. I made minor changes such as adding arugula leaves for extra spice and color and substituting fresh herbs for capers in the tapenade. Since everything in this recipe can be made the day ahead, it’s a great weeknight meal when you’re short on time.


Grilled Lamb Sandwiches with Sage Aioli and Sun-Dried
Tomato Tapenade

Serves 4
Print recipe only here.
Marinade:
4 lamb steaks (about 4-6 ounces each)
½ cup olive oil
1 Tbsp finely chopped fresh thyme
4 rosemary sprigs
salt and pepper
2 bunches spring onions, trimmed
1 tsp olive oil

2 French bread baguettes
A handful of arugula leaves

Salt and freshly ground black pepper
Sage Aioli:
2 tsp extra virgin olive oil
3-4 sage leaves, finely chopped
1 cup mayonnaise
1-2 tsp fresh lemon juice
Sun-Dried Tomato and Black Olive Tapenade:
½ cup minced mixed cured olives, such as Kalamata, Cerignola, Nicoise
4-6 oil-soaked sun-dried tomatoes, coarsely chopped
2 Tbsp good olive oil
1 Tbsp minced fresh basil
1 Tbsp minced fresh parsley
2 tsp fresh lemon juice, plus some zest
Several shakes of crushed red pepper
Marinate lamb in olive oil, rosemary, thyme, and salt and pepper for at least 4 hours or overnight.
To prepare the sage aioli, combine all ingredients in a food processor and process until smooth. (Can be made ahead.)
To prepare the sun-dried tomato tapenade, combine all ingredients in a food processor and process until smooth. (Can be made ahead.)
To prepare sandwiches, preheat grill. Brush green onions with 1 tsp olive oil and season with salt and pepper to taste. Grill for 2 to 3 minutes on each side until almost cooked through; remove from heat. Remove lamb from marinade, and season with salt and pepper to taste. Grill the lamb until the thickest part registers 135 degrees F. for medium rare, turning occasionally, about 4-6 minutes per side. Transfer to a platter and tent with foil. Let stand 10 minutes. Brush bread with some olive oil and grill, until golden brown, about 1 minute.
Spread some sage aioli and sun-dried tomato tapenade on each sandwich. Top with meat, some green onions, and a few arugula leaves.

This second recipe is also from Hot Off the Grill with Bobby Flay on The Food Network. The only changes I made were making kebabs with cherry tomatoes, omitting the garlic, and serving it with whole wheat pita bread. You may want to make extra jam...I was eating it by the spoonful.


Lamb Kebabs with Minted Cucumber Chutney and
Tomato-Eggplant Jam

Serves 4
Print recipe only here.
Marinade:
1 ¼- 1 ½ pounds lamb, cut into 16 equal pieces for skewers
½ cup olive oil
4 rosemary sprigs
1 Tbsp fresh thyme

16 cherry tomatoes, for skewers
4 whole wheat pita breads
Minted Cucumber Chutney:
8 ounces yogurt, drained

¾ cup seedless cucumbers, peeled and diced
1/4 cup mint, chiffonade
2 Tbsp finely diced green onions
1 Tbsp fresh lemon juice
¼ tsp cumin
Salt and freshly ground pepper
Tomato-Eggplant Jam:
1 small eggplant, thickly sliced
2 Tbsp olive oil, divided
Salt and pepper
1 cup cherry tomatoes, halved and seeded
1 Tbsp fresh lemon juice
Marinate the lamb in olive oil and fresh herbs at least 4 hours or overnight.
To drain yogurt, place in a fine mesh sieve over a bowl; refrigerate for at least a couple of hours. Place the drained yogurt in a medium bowl. Add the remaining ingredients, and season generously with salt and pepper. Let sit at room temperature for about 30 minutes before serving.
Brush the eggplant slices with 1 tablespoon of olive oil, and season with salt and pepper. Grill until just cooked through and lightly golden brown. Cut the eggplant into 1/2 inch dices. Place in a medium bowl, and toss with the remaining ingredients.
To warm pitas, place on grill for about 1 minute, flipping once. Keep under tented foil until ready to use.

To cook meat, preheat grill. Remove the lamb from the marinade, and season with salt and pepper. Alternate 4 pieces of lamb and four cherry tomatoes per skewer. Grill for 4-6 minutes, turning as needed, for medium-rare.
Serve cooked kebabs with chutney, jam, and pita breads.

You might also like:
Sausage and Broccoli Rabe Sandwich
(Giant) Grilled Lobster
Fritatta (Fri-taaa-ta) Sandwich


Save This Page on Del.icio.us

Thursday, July 5

Lobster So Big, You Could Put a Saddle On It and Ride It (video)

In my family, everyone loves lobster.

I mean just look at my dad and my husband: who's more ecstatic?


It all started one glorious summer Sunday afternoon many years ago when Jeff and I were dating. We took a ride with my parents to Galilee, in Rhode Island, where local fishermen were selling freshly caught lobsters. My dad (in a typical moment of generosity) offered to buy a couple; he’s had Jeff eating out of the palm of his hand ever since.

Jeff and I recently took a red-eye to Rhode Island for an impromptu visit. Since the New England lobster season starts in April-May, we timed it perfectly.

One afternoon we took a ride to fabulous Newport and discovered a fish market that was selling lobsters. Not just any lobsters. 10, 12, even 14 pound lobsters! My dad picked up a 14-pounder and exclaimed, "this one's so big you could put a saddle on it and ride it.”

Fearing that a 14-pounder's meat might not be tender enough, we asked the fisherman’s advice. This guy couldn't have been cast better if he were in a movie about RI: Red Sox cap-wearing, Right-out-of-the-Soprano's-massive guy with huge hands, which were clearly accustomed to scooping up lobsters.


He also had a wicked sense of humor, and in-between wise cracks, assured us that meat from larger lobsters can be tender. The key is in the cooking. "Whateva youz do, DON'T overcook it. Otherwise, youz'll be back here tomorra complainin that these were no good," he warned us.

Most people agree that the smaller the lobster, the more tender the meat. Yet, the very thought of feasting on an 8 or 12 or 14 pound lobster easily seduced my dad. He settled on two: an 8 3/4 pounder and a 9 1/2 pounder (which is the one he's holding), mostly because of logistics -- we simply didn't have a pot big enough for a 14 pound lobster.

As he went to pay the lobster guy, words were exchanged, and then suddenly, my dad turned and left. We all panicked. Oh, no! Did dad offend the lobster guy? "No lobster for you!"


Thankfully, no. My father explained, the guy told him, “Come back in an hour or so. Something tells me the prices might go down.” An hour later, we returned, and as he said, the prices went down.

My dad left the market holding his lobsters like a proud father of twins coming home from the hospital. I think this was the beginning of a beautiful friendship between Dad and the lobster guy.

There are myriad ways to cook lobster, including boiling, baking, grilling, and poaching in vanilla, which seems to be de rigeur on this season’s Top Chef, doesn't it? We opted for grilled lobster, which was a hit with everybody.

So how do you grill a lobster? As most chefs and grilling experts suggest, we boiled the lobster first. The amount of water and cooking time will vary depending on the size of the lobster you use. Just be sure that you have a BIG POT.


To kill the lobster, hold a butcher knife over its head, about an inch behind its eyes (as shown below) and puncture and slice forward in one motion.


Drop the entire lobster into boiling unsalted water. Most recipes suggest boiling until the shell turns red, about 5 minutes for a 1 ½ pound lobster. We cooked ours about 20-25 minutes because of their large size. Just note that the lobster should not be completely cooked at this point; it willl finish cooking on the grill. After you remove the lobster, let it cool slightly before continuing.


In order to save my mom's kitchen, we took our boiled lobster outdoors, where my dad proceeded to slice them in half, lengthwise, and to crack the shells in order for the meat to get exposed to the grill’s flames. This was no easy task. Check out this short film of a 200-pound-guy-with-a-hammer whaling on a lobsta that just wouldn't crack.


Now, that it is open, you can brush the meat and the inside of the lobster with melted butter.

Place the lobster flesh side down on a pre-heated grill, and cook until the meat forms some grill marks and begins to turn opaque, about 4-6 minutes for a 1 ½ pounder. Ours took about 8-10 minutes.

Baste them with melted butter, as Jeff's mom, Dorothy, is doing, to help seal in the moisture and make the meat succulent.

Flip the lobsters over and cook for the same amount of time that you did on the first side. Be careful to not drip too much butter directly onto the grill or large flames will leap up at you. (Who needs eyebrows anyway?) Thank goodness my husband's a dermatologist. Oh wait, he tells me dermatologists don't do burns; however, if the medication used to treat the seared eyebrows causes some kind of rash, then he could help us.

The lobster is done when the shell turns a deep red, and the meat is opaque. Check the meat at the thickest part of the tail to make sure it's fully cooked. Remove the meat from the shells, and serve with your desired accompaniments.

Everyone at our house savored the smoky flavor of the grilled lobster and enjoyed it with simple melted butter and lemon or with my mom’s famous tartar made from horseradish, ketchup, mayo, lemon juice, and Tabasco.

According to everyone who ate the grilled lobsters (in a state of buttery drenched delirium) that evening, their concerns were allayed; the meat was perfect.

*Print recipe only here.

*For a simple how to grill lobster guide, check out this article from about.com.

*I also just discovered a delicious recipe for Grilled Lobster and Potatoes with Basil Vinaigrette on epicurious.com that was featured the June 2007 issue of Gourmet.

*Finally, thanks to my new friend Mark from New Hampshire who sent me a link to this interesting article from The Boston Globe. It's about "colossal crustaceans" and corroborates my story!

Come'on over. Food Blogga will be hosting Weekend Herb Blogging next week (July 9-15).


Save This Page on Del.icio.us


You might also like:
Painful polenta
What threat? I made you a Ricotta pie.

Waffles, Coffee, and Lentil Soup
Bring back Sunday dinner